Table of Contents
Installing Windows XP \ 2003 directly to an iSCSI target
About IntegrateDrv
IntegrateDrv is a program that lets you integrate Plug and Play drivers into a Windows Installation.
Using this program, you can install Windows 2000 \ XP \ 2003 Directly to an iSCSI target.
Prerequisites
- IntegrateDrv (1.0.1 or newer)
- sanbootconf (1.1.1 or newer, 1.1.2 is required for Windows 2000)
- Text-mode setup does not support the virtual bus device architecture, if you have an nVidia network adapter, Broadcom NetXtreme II, or other adapter that its official driver implements a virtual bus, you have to obtain a text-mode compatible driver (a.k.a RIS-compatible driver) to be used during the installation. (a text-mode compatible driver for nVidia NICs is bundled with IntegrateDrv)
Using IntegrateDrv
There are two ways to use this program:
Method #1: Integrating to an iSCSI disk containing Windows setup
Instructions:
Creation of an iSCSI disk containing Windows setup:
1. Create a new disk on your iSCSI target.
2. Create a primary partition on the disk you've just created (the partition has to be XP \ 2003 compatible, so it's best to create the partition from Windows XP \ Server 2003 OS).
3. Mark the new partition as active.
4. Format the partition you have just created.
5. Use winnt32.exe to create an installation of the OS you want to install on the new partition:
To install a 32-bit edition of Windows the command is:
D:\I386\winnt32.exe /syspart:c /tempdrive:c /makelocalsource /noreboot
To install a 64-bit edition of Windows the command is:
D:\AMD64\winnt32.exe /syspart:c /tempdrive:c /makelocalsource /noreboot
- assuming C is the drive letter assigned to the new partition
- assuming D is the CD where the OS installation is located
- the /syspart and /tempdrive switches will make sure that all the necessary boot files will be copied to the specified drive
6. Select “New Installation (Advanced)” and complete the process of creating the installation on the disk.
Integration of the iSCSI components:
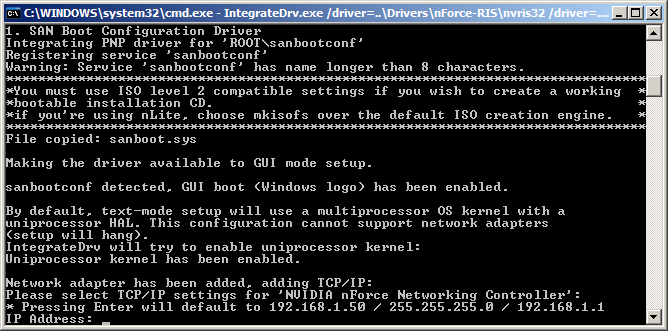
7. Use IntegrateDrv to integrate the NIC drivers, Microsoft iSCSI Initiator and sanbootconf into the temporary Windows installation Directories:
if the computer used is the target computer, the command you should use is:
IntegrateDrv.exe /driver=..\Driver\E1000\x86 /driver=..\Driver\iScsiPrt\x86 /driver=..\Driver\sanbootconf /local /preconf /target=C:\
if the computer used is the not the target computer, or you would like to use NICBootConf, the command you should use is:
IntegrateDrv.exe /driver=..\Driver\E1000\x86 /driver=..\Driver\iScsiPrt\x86 /driver=..\Driver\sanbootconf /driver=..\Driver\nicbootconf /target=C:\
- you shoud specify the path to your network adapter driver instead of the Intel E1000 in the example above.
- the /local and /preconf switch tells IntegrateDrv that the machine running IntegrateDrv is the target machine, and that the NIC should be pre-configured based on the local machine's hardware configuration.
- NICBootConf is a driver that configure the NIC during boot (with NICBootConf, your system will still successfully boot via iSCSI even if you'll move your network adapter from one PCI slot to another).
8. You will be asked to specify a default static TCP/IP address. if all goes well, this address will not be used, and instead sanbootconf / iScsiBP will set the address that was provided by your DHCP server.
9. Congratulations, you now have an iSCSI capable Windows XP \ 2003 installation, you can reboot your machine, and use the sanboot command to boot into the installation:
dhcp net0
sanboot iscsi:192.168.1.11::::iqn.2007-08.name.dns.target.my:iscsiboot
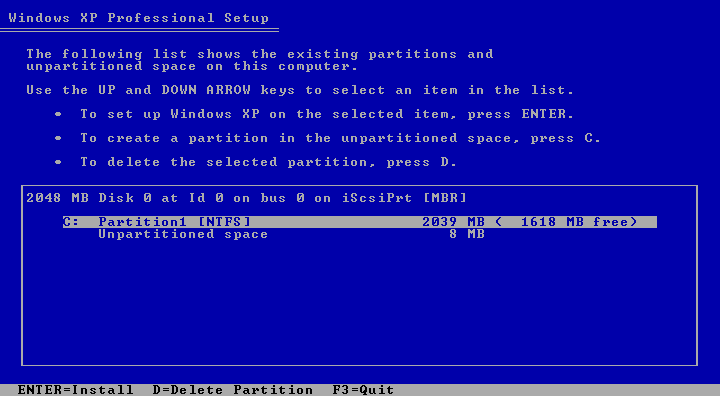
10. The installation should detect your iSCSI disk:
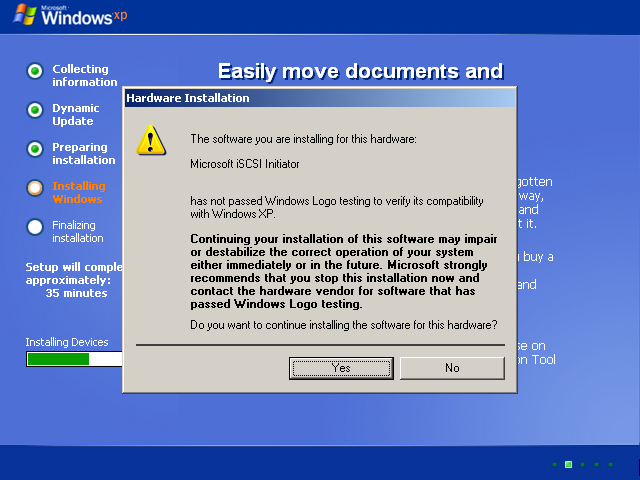
11. During GUI-mode installation phase, you'll be warned about installing unsigned drivers:
Some of the drivers had to be modified to start during boot, and as a result their signature is no longer valid, you can safely ignore these warnings, and approve the installation:
Method #2: Creating an iSCSI capable installation CD
you can use IntegrateDrv as described in step 7 above to create an iSCSI capable Windows installation CD.
The easiest way is to use nLite to create a working directory, and then use IntegrateDrv to integrate the necessary drivers to this working directory using the /target switch, and then create a bootable ISO using nLite.
- Note that if you use sanbootconf you must use mkisofs as the ISO creation engine.
After you've created a CD with the necessary iSCSI drivers, you use the sanhook command to connect to the iSCSI target, and then exit iPXE and fall back to the CD-ROM (your BIOS should be set up accordingly):
dhcp net0
sanhook iscsi:192.168.1.11::::iqn.2007-08.name.dns.target.my:iscsiboot
exit
If all goes well, and your BIOS is configured properly and bug-free, then Windows setup should start running from the CD-ROM and the iSCSI disk should be recognized.
Supplement
Additional notes from years after the hey days of XP 2003.
- http://etherboot.org/wiki/sanboot/winnt_iscsi for adding iSCSI support to an existing installation to Windows xp/2003, and booting from it
- placeholder for future notes that does help to render this list more nicely